Click Here for: Frequently Asked Questions
| Best Paint To Use: Masonry, Stucco & Brick Paint. Found at local hardware store. |
Trapezoid ceiling: Using corner blocks |
Style with no Corner Block |
|
|
|
|


|
Painting instructions |
Style of Corner Block |
|
|
|


The best way to Glue a Crown Molding
A Crown Molding can be glued with Paneling Wood & Foam Molding Adhesive. This glue works best if you apply the glue to the Crown Molding only, then press it firmly in place on the wall and hold it into place.
The best way to Paint a Crown Molding
After installing the Crown Molding, the Crown Molding should be painted with a brush or spray paint, and works best if you use a water-based paint. It is not necessary to apply primer.
Note:
Never use lacquer based paints or lacquer thinners.
Never paint with enamel paint.
You can test a scrap piece and allow a few hours for results
Installing Crown Molding is very easy.
Nails, Hammers, Screws, expensive miter saws or stud finders
are not necessary for this application.
Material & Tools List
* PL Premium Adhesive * Latex Caulk or Caulk gun
* Spackling or drywall compound * Plastic putty
* Screwdriver & Drywall screws * Fine tooth saw
* Rags, sponge or brushes * Ruler
Please note: For “invisible” joints bevel the edges of parts which have to be joined.
For better fit that is flat or but joint use longer lengths of crown molding. Cut all pieces 1/8 inch longer than the measurement required, fitting the ends in place first and the middle sections last.
Because of the way the bonding surface are design, cables can easily be concealed behind crown molding base boards.
 |
 |
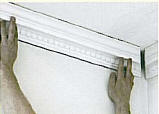 |
| First of all, run a damp sponge over all the surface to be glued before applying the adhesive-filler, check your cuts and make sure that the mounding is flush with the wall. | To apply the mounding, be sure to align it exactly on the marks made with the line. Press to make sure that any surplus adhesive-filler comes out onto the wall and the ceiling. | |
 |
 |
 |
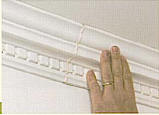
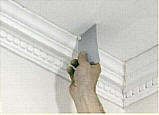
| When applying ARSTYL moldings, do not forget to use the dowels. Leave a gap of 2-3MM at each joint and fill with adhesive filler. | Using a spatula, scrape off any excess adhesive and clean promptly with a damp sponge. | |
 |
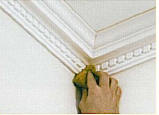
After allowing 24 hours to dry, proceed with the painting phase. | |
Additional Instructions:
(1) Use PL Premium Adhesive (available at most hardware and home improvement stores, comes in a caulk tube), run smooth continuous bead down entire length of foam piece, top and bottom.
(2) Cut moldings using a fine tooth saw (hacksaw blades, without the handle, work well). On smaller sizes a miter saw can be used – the tighter the joint, the easier it is to fill later. For straight cuts, use the outer edge of the miter box.
(3) Lightly sand the cut edges with emery paper or cutter and remove the sawdust.
(4) Apply the adhesive to the bonding surface. Glue ALL joints using PL Premium Adhesive. REMOVE ALL EXCESS Glue using a spatula and wipe with a damp sponge.
(5) Follow drying times on adhesive. (Around 15 to 20 minutes)
(6) Use a latex caulk to fill top and bottom seams. Also use caulk on inside miter joints. Be sure to clean up excess caulk immediately.
(7) Let caulk dry 24 hours then apply final coat of paint.